4 steps for a good workflow in the construction industry

Do you have to put in a lot of effort in to bringing the project to a successful end, so that everything is formally correct? How to control chaos and improve your construction workflow?
Workflow is, in other words, a method of smooth management of various stages of project implementation so as to improve its course. Can a good workflow be implemented in the construction industry? Yes! You need a good plan, automation of work steps and functional solutions!
End of the week? Time for an invoice.
In the Netherlands, the weekly work settlement system is most often in place, especially in the construction industry. This means billing per week on the basis of hourly wages. So you invoice your clients every week based on the hours worked.
During this week you work on many matters, sometimes you also run several projects at the same time. In addition, each of these projects generates additional costs for you – from materials to mileage. And a lot of it! Your job is not the easiest, you have a lot to do. What to do to sort it all out and streamline it? You can hire a manager to manage it all …
Or you can simply use a system designed carefully with the daily challenges of your work in mind. Curious how it works?
Step-by-step to better construction workflow.
Step 1: Write everything down
Do you know this feeling when on Friday morning you try to remember what you were doing on Tuesday? Or when you go through the pages of your calendar looking for a clue of what happened a few days ago? Working so intensively, you have the right not to remember everything!
That is why regularity and good habits are so important! By recording every task you do on an regular basis, you take the burden of remembering about the hours of work you do. You will eventually get used to it and you will do it automatically, without much thought. Write things down fast! You can write your progress down in the system on your phone in less than a minute. More about time registration read HERE.
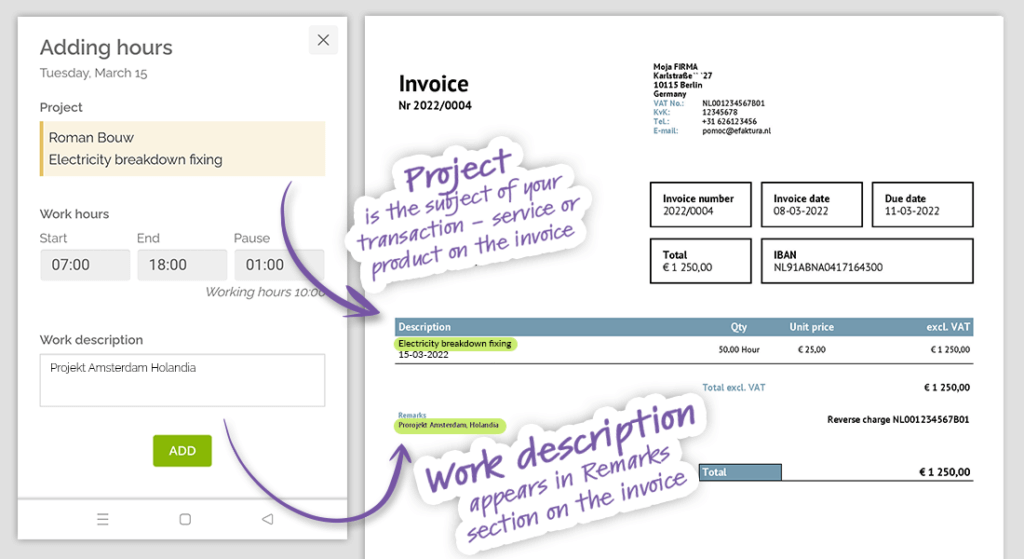
Select a day, add a client and a project. Remember that whatever you enter into the project, you provide an invoice! For example: If you had a plaster project at client X – you name that project accordingly. You can add additional information in the description, if you want – it will appear in the notes on the invoice. START time, STOP time and you’re done – you continue working.
Write everything down!
Do you commute to work with your own car? Are you bringing missing materials to the construction site every now and then?
By registering kilometres and costs, you can add them to the project! Why do you need mileage? Read HERE. Now making a comprehensive project settlement is a piece of cake – you have all the data at hand.
At the end of working on a project, add a line with the mileage mark and incurred material costs to the invoice.
Step 2: Time to summarize your work
Are you finished with the plaster project? Check how long this project took you by downloading the hourly statement.
In the calendar under TIME REGISTRATION, select the period of time to be settled and select the project for which you want to issue an invoice. The system will generate an hourly overview with all the necessary information. You have them available in the list under the calendar. You decide what happens next!
Step 3: Better safe than sorry!
It’s good practice to give the customer the statement for approval before issuing the invoice. Do you have to do this? From a tax point of view, no. Is it worth doing? Definitely yes.
By obtaining the acceptance of the working time summary, you avoid misunderstandings. In addition to that, a customer acceptance protects you legally – it’s a solid basis for issuing an invoice – it is impossible to argue with this!
• You can send clients the downloaded pdf list by e-mail and wait for acceptance.
• If you have the PRO package – you can do even more! Send the statement to a client with a request for approval (an automatic system message – you don’t have to write anything yourself) of the statement straight from the system. The customer’s response will then be sent to your e-mail address.
• The second option in the PRO package is to use the digital signature feature. Give the client your phone with the “add to sign” window – this is where the client can give their signature with their finger! The customer’s signature will be attached to the document with the schedule of hours.
Step 4: Issue an invoice!
Everything went smoothly, the client accepted the statement – it’s time for the most pleasant task.
• Collect all the necessary elements and issue an invoice – with the hourly rate, possible costs and mileage. Have you recorded everything in the system on a regular basis? All the data you need is ready for you to use!
• Are you a PRO? Convert an hourly wage into an invoice with one CLICK – add additional costs, enter the hourly rate and that’s it. Done! By sending an invoice from the hourly rate, your work time statement will be automatically attached to the message. Really professional!
Do you have a construction company? eFaktura simplifies everything!
We wish you many opportunities to issue invoices with pleasure and satisfaction from your work. It would be great for customers to pay these invoices promptly.
• Having customers who procrastinate? Send them a reminder from the system!